 | « Back to article | Print this article |
TOP 5: Yoga poses for strong sexy arms
Yogaacharya Shameem Akthar, trained with the Sivananda Yoga Vedanta Center, takes you through five exciting arm-upper body toning poses.
The most visible sign of one's health is seen on one's arms. If they look toned and fit, the rest of your body will follow suit. However, working only some muscle groups at the expense of others (as often happens when fitness regimens go awry) can cause body stiffness, shoulder pain and even create injuries that will give you chronic pain. Working the arms must thus challenge all muscles groups simultaneously.
It must also create a nerve-muscle connection. Often, when you use machines or weights to tone your limbs this sort of co-ordination and neuronal networking is not encouraged. Being aware, focused on the muscles you are using, will go a long way in toning them up and not just on the superficial level. In fact, often healing is facilitated only when such awareness is brought into fitness.
In yoga arm and upper body tone-up is encouraged even at the warm-up level, in the plank or setuasana. If you wish to up the ante, there are several variations of this pose. For those who are more adventurous and focused, the arm balancers will remain a continuing challenge.
These are fabulous poses, and though they look intimidating, can be learnt if you bring a bit of playfulness into them.
Obviously, you must already have a strong and sustained yoga practice. In the yogic arm toners, though initially the weight of the body seems to be on the arms, you will find out that chest muscles, upper back muscles, even hip muscles need to be engaged and challenged.
The more challenging arm balancers also involve the nervous system, especially the animalistic part of our brain, thus toning even our personality!
Shameem Akthar, yogaacharya trained with the Sivananda Yoga Vedanta Center, takes you through five exciting arm-upper body toning poses.
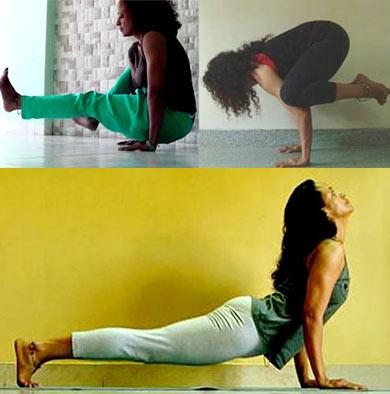
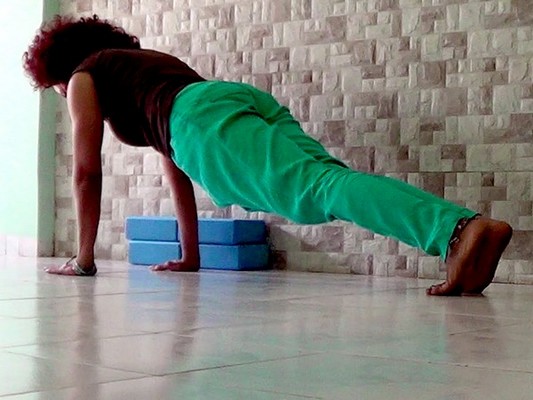
Setu asana (Plank pose)
Go on your fours, palms flat on the mat, under the shoulders. Walk the feet back. Inhale, straightening the legs and lifting the knees off the floor. Shift the weight to the arms and wrists. Continue normal breathing. Ensure that your hips are not lifted high (that will shift the weight to the legs).
Also avoid scrunching the shoulders or bending at the elbows. Look ahead. Hold initially only for few seconds. Do a few times. Later, after sustained practice, increase the duration to 15 seconds, and progressively more.
Avoid: All these poses if you have weak wrists.
Benefits: Tones arms, upper body, builds overall stamina, improves focus.
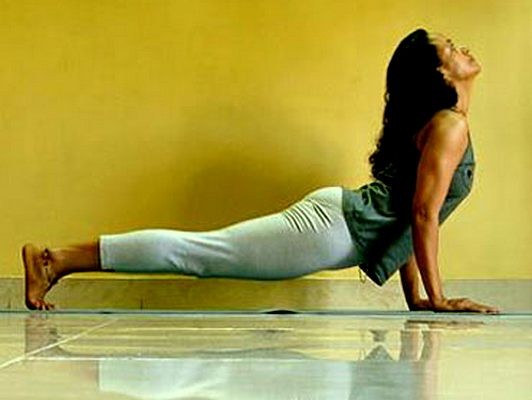
Urdhvamukhasvanasana (Upward facing dog pose)
Lie on your stomach, place palms flat under either shoulders, with chin on the mat. Inhaling sweep your chest off the ground, curving the back and lifting the knees off the ground simultaneously. Push the heels back. Look up, breathing normally. Hold for a few seconds, increasing duration in the final pose after a few weeks. Ensure the spinal arch is maintained. Avoid scrunching the shoulders.
Benefits: Same as Setu asana
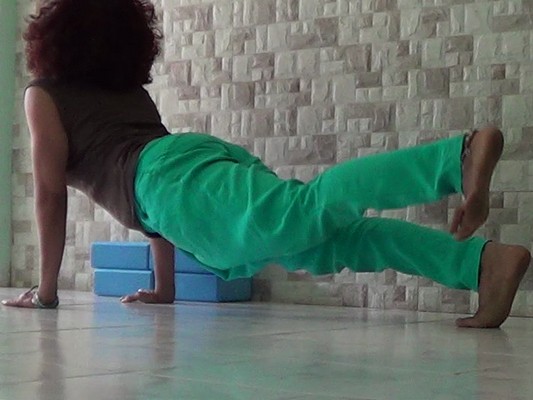
Urdhvamukhasvanasana (Upward facing dog pose)
Stay in Urdhvamukhasvanasana, then lift the right leg off the ground, keeping the foot as if against a wall at the back. Do not lift the leg too high. Hold for five to ten seconds. Drop and do for the other leg.
Points to note: This can be tried only after learning the earlier version.
Benefits: Same as Setu asana.
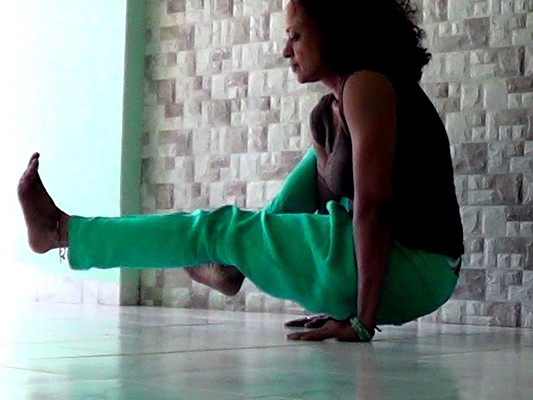
Ekapada bhujapidasana (One legged shoulder pressing pose)
Sit with legs out in front. Keep palms flat beside the hips. Bend the right leg at the knee, tilt the torso forward, pass the shoulder under the bent right knee.
The other leg remains stretched straight out in the front. Push both palms firmly on the ground.
Focus on the stomach and the left leg as you lift the hips off the ground. Hold for a few seconds, breathing normally. Release to gently drop hips and legs back to the ground. Do for the other side.
Avoid: If having any cardiac, lower back problem or wrist pain.
Benefits: It is a fabulous tone-up pose, working on the legs, arms, chest, stomach and back muscles simultaneously. This pose is a good marker to determine real strength.
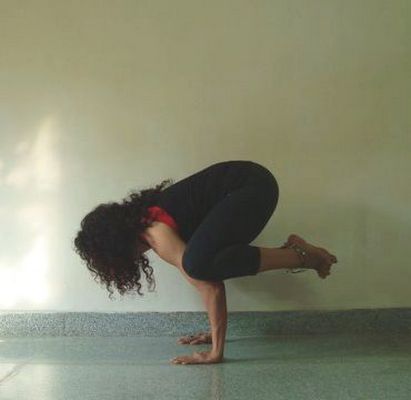
Kakasana (Crow pose)
Also called Bakasana (crane pose), Bakadhyanasana (Meditating crane pose) is an exciting arm balance. It may be tried only after you have sustained practice in the other poses.
Ideally this is learnt from a teacher who can point out errors in execution. This may be important to achieve the pose. It will also prevent accidents. (How can you prepare for Bakasana? Read this!)
Stand up straight, feet wide apart. Lean over, to place palms flat on the ground, a foot and a half ahead of the feet. Keep the spine curved out. Then tilt the torso to place each knee on either upper arm, above the elbow.
Each arm would bend naturally at the elbow, which would ensure the leg remain locked at the point where you placed the knee. Lock the legs firmly into the arm. Keep your eyes focused on some spot, about one or two feet high and off the ground.
To do this you will need to lift the chin up (this is important, so you do not fall face down). Lift one toe off the ground gently, keeping your eyes fixed on the ground. Then lift the other also off. Maintain the balance, breathing gently (heavy breathing will make the balance shakier).
Then drop the feet back, to break the pose. Most anxious beginners will nervously jerk into the pose. This will be counterproductive and cause a fall. It requires a lot of mental focus to execute the practice and must only be attempted by those who have such co-ordination.
Benefits: Tones the arms, upper back, chest muscles fabulously. Has a similar effect to the headstand because the pressure shifts into the face and head when you learn to hold it for long. Develops emotional confidence, helps fight shyness, control stammering, and aids impulse control.
